MPNH Floor Extension

Construction & Work Methods
The construction process for the second floor extension is broken down into several phases. Before construction begins, certain areas of Mount Pleasant Neighbourhood house will be sectioned off. After the construction zone has been sectioned off, the required equipment can be moved in, and deconstruction can commence. Upon completion of the deconstruction phase, construction of the second floor extension will take place. Finally, after construction of the structural components are complete, interior finishing and clean up will close out the project. A simplified flow chart for the construction process is shown in the figure 1 below.

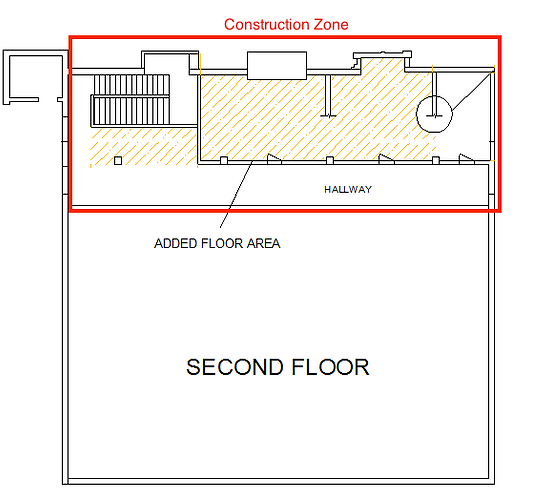
The first phase of construction requires all areas of the first and second floors which are in the construction zone to be sectioned off from the rest of the building. The sections of the first and second floors which are deemed to be within the construction zone are indicated below. The areas indicated must be completely cleared, i.e. all furniture, decorations, pictures, etc. belonging to Mount Pleasant Neighbourhood House must be removed. After everything has been removed, protective measures will be implemented to protect the existing hardwood floor, and to section off the construction zone from the remainder of the building. Plywood or protective mats will be laid over the existing hardwood floor to prevent damage from falling debris and to protect it from the scaffolding which will be set up ontop of it. Plastic tarps and/or sheets will be used to quarantine the construction zone to limit dust and debris from entering the remainder of the building. It is intended that the essential functions of Mount Pleasant Neighbourhood house will remain in operation for the majority of the project.
In the second phase, which will commence once the construction zone is cleared and sectioned off, construction equipment will be moved in. The low level scaffolding system, required to deconstruct existing walls and construct the new floor and walls, will be assembled. With the scaffolding system in place, deconstruction will commence. The following list describes the components which require demolition, or deconstruction:
1. Disassemble the west facing (glass) wall and ceiling of the existing meeting room on the northeast corner of the second floor. See Figure 3 below.
Figure 3: Previously Added floor Extention
2. Remove the existing railing which runs along the main second floor hallway (location of new 8’ fixed walls which will separate the hallway and newly constructed space).
3. Remove sections of drywall all the way around the perimeter of the walls to allow for the beams, floor, and walls to be tied into the existing structure.
The third phase of the construction involves framing the new floor and walls and tying them into the existing structure. First the three Douglas Fir beams will have to be raised up using the hoist system and secured into place, as shown in the design drawings found in the Conceptual Design Section. The beams will be tied into the existing structure by fastening them to the existing vertical 12”x12” columns. The Douglas Fir beams will span a distance of approximately 14’ and will be spaced 14’ on centre. The 2”x10” floor joists will run across the beams and will be spaced 16” on center. The joists will be secured to the beams using steel joist tie brackets.The ¾” tongue & groove plywood subfloor will then be screwed down into the floor joists. After construction of the floor, the 2”x4” studs will be used to frame the 8’ (partial height walls). The walls will be constructed using conventional 2”x4” stud framing techniques. The studs will be spaced 16” on centre. The walls will be tied into the existing frame of the building and screwed to the subfloor. There will be three openings in the wall, at the locations specified on the drawings, for the doors to be installed.
The fourth phase involves installing the 4 exterior vinyl windows and the wood frame glass enclosure walls. Four, 2’x4’ window openings have to be cut into the exterior wall as indicated in the project drawings. After the openings have been prepared according to the structural requirements, the 2’x4’ vinyl windows can be installed. After the 8’ partial height walls have been constructed, a glass/window company will be required to come in and measure the openings between the top of 8’ walls and vaulted ceiling. Once the wood frame glass enclosure walls have been constructed the glass/window company will properly install them. Using wood frame glass enclosure walls allows more light to enter into the room and provides a soundproof barrier between the rooms.
After all the structural elements have been completed, the fifth phase can begin. The fifth phase involves interior finishing of the newly constructed floor and walls. First, an electrician will be required to wire and install all the electrical receptacles, switches, junction boxes, and lights. Light fixtures will be required to be installed on both the first and second floors to provide adequate lighting for these spaces. Internet and phone lines will also have to be wired at this point by the current provider. A gas fitter will be required to run the gas lines and install the gas fireplace on the second floor. After all the electrical and gas lines have been run, fiberglass insulation can be placed between the studs in the walls to help soundproof the walls. The drywall will then be used to finish the newly created walls and the ceiling of the first floor. The drywall on the first floor ceiling will be screwed into the joists and the fir beams will be left exposed. Drywall panels ⅝” thick were selected over ½” panels to meet the requirements for fire retardant interior walls. Next, the ½” engineered hardwood flooring can be installed over top of the plywood subfloor and the three 36” doors can be installed. Finally, the company providing the movable paired panel partition walls will be brought in to assemble the wall panels, and install the partition walls.
Upon completion of final construction, the cleanup process will begin. The scaffolding will be disassembled and removed, the protective mats and plastic tarps will be taken down, and the furniture and decorations can be moved into place.

Figure 1: Construction Flow Chart Figure 2: Construction Zone